
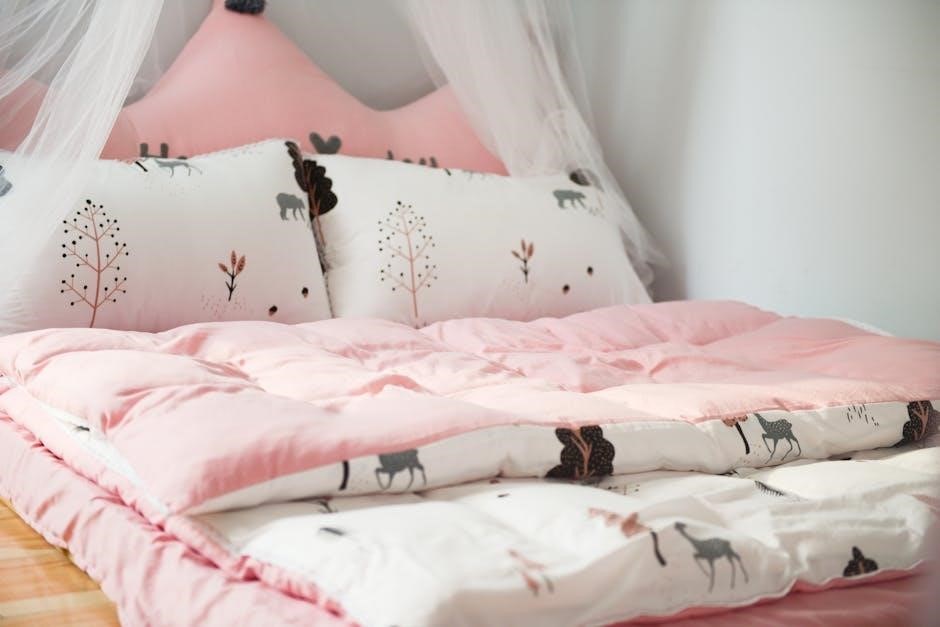
Rag quilts have surged in popularity for their cozy charm and versatility․ These quilts feature frayed seams and layered fabrics‚ offering a rustic‚ homespun aesthetic․ Discover endless designs with free PDF patterns‚ perfect for crafters of all skill levels‚ ensuring easy access and printing for a delightful sewing experience․
1․1 What is a Rag Quilt?
A rag quilt is a unique‚ layered textile featuring frayed seams that create a distinctive‚ rustic appearance․ Typically made from fabric strips or blocks‚ these quilts are popular for their cozy‚ homespun charm․ The fraying process adds texture and visual interest‚ making each quilt truly one-of-a-kind․ Rag quilts are versatile‚ suitable for bedding‚ decorative throws‚ or even baby blankets․ They are often made using simple patterns‚ making them accessible to quilters of all skill levels․ With free PDF patterns widely available‚ crafting a rag quilt has never been easier or more enjoyable for sewers looking to create something warm and personalized․
1․2 Benefits of Using Free Patterns
Free rag quilt patterns offer numerous advantages for crafters․ They provide an affordable way to explore various designs without financial commitment․ These patterns are often comprehensive‚ including step-by-step instructions and material lists‚ making them ideal for beginners․ Additionally‚ free PDF formats allow easy downloading and printing‚ ensuring convenience for sewers․ Many websites offer a wide range of styles‚ from simple strip quilts to intricate block designs‚ catering to all skill levels․ This accessibility encourages creativity and experimentation‚ helping quilters refine their skills and build confidence in their abilities․ With free patterns‚ anyone can embark on a rag quilting project effortlessly․
1․3 Why Choose PDF Formats?
PDF formats are a preferred choice for rag quilt patterns due to their convenience and clarity․ They provide high-quality‚ scalable images and precise instructions‚ ensuring accuracy in measurements and designs․ PDFs are easily downloadable and printable‚ allowing crafters to access patterns anytime without internet reliance․ This format maintains the layout and formatting of the original document‚ making it ideal for complex patterns․ Additionally‚ PDFs are universally compatible across devices‚ offering a seamless experience for quilters․ The ability to save and print only necessary pages further enhances their practicality‚ making PDFs a reliable and efficient option for crafting projects․
Popular Types of Rag Quilt Patterns

Rag quilts come in various styles‚ offering versatility for crafters․Strip‚ block‚ charm‚ and baby patterns cater to different skill levels and preferences‚ ensuring a customizable experience․
2․1 Strip Rag Quilt Patterns
Strip rag quilt patterns are a popular choice due to their simplicity and versatility․ These patterns involve sewing together long fabric strips‚ which are then clipped and frayed to create the signature ragged edges․ This method is ideal for beginners‚ as it requires minimal cutting and piecing․ The strips can be made from scrap fabric‚ making it an eco-friendly and cost-effective option․ The repetitive nature of sewing strips makes it a great way to practice sewing skills․ Free PDF patterns for strip rag quilts are widely available online‚ offering a variety of designs and sizes to suit all preferences and skill levels․
2․2 Block Rag Quilt Patterns
Block rag quilt patterns offer a traditional and visually appealing design․ These patterns involve sewing fabric blocks together‚ with each block featuring a unique or coordinating design․ The blocks are then clipped and frayed to create the signature ragged edges․ This method allows for greater creative freedom‚ as quilters can experiment with different fabric prints‚ colors‚ and layouts․ Free PDF patterns for block rag quilts are readily available‚ providing step-by-step instructions for beginners․ The block style is ideal for those who enjoy working with larger pieces of fabric and want a more structured yet customizable project․ It’s a great way to showcase favorite fabrics while creating a cozy‚ textured blanket․
2․3 Charm Rag Quilt Patterns
Charm rag quilt patterns are a delightful way to create a quilt using small‚ identical fabric squares called “charms․” These patterns are ideal for quilters who enjoy working with pre-cut fabrics or scraps․ The charm size‚ typically 5×5 inches‚ allows for a cohesive yet varied design․ Free PDF patterns often include layouts that maximize the charm’s potential‚ making it easy to achieve a professional finish․ Perfect for beginners‚ charm rag quilts require minimal cutting and sewing‚ resulting in a cozy‚ textured blanket with a unique aesthetic․ They are a great choice for those who love experimenting with fabric combinations and patterns․
2․4 Baby or Child Rag Quilt Patterns
Baby or child rag quilt patterns are perfect for creating adorable‚ soft blankets tailored for little ones․ These patterns often feature smaller squares or strips‚ making them ideal for crib-sized quilts or lap blankets․ Free PDF patterns typically include designs with gentle textures and rounded corners for safety․ They often incorporate whimsical fabrics‚ like cartoon characters or pastel colors‚ to suit a child’s theme․ These quilts are lightweight and easy to handle‚ making them a great gift for newborns or toddlers․ The patterns are simple to follow‚ ensuring a quick and heartwarming project for parents or grandparents․

Tools and Materials Needed
A sewing machine‚ sharp scissors‚ rotary cutter‚ and mat are essential․ Cotton fabrics‚ coordinating threads‚ and batting are primary materials․ Notions like pins and needles are also required․
3․1 Fabric Requirements

For a rag quilt‚ you’ll need high-quality cotton fabrics‚ as they are durable and fray well․ Pre-wash all fabrics to ensure they shrink evenly․ Use a variety of coordinating patterns and solids for visual interest․ The amount of fabric needed depends on the quilt size and pattern complexity․ Typically‚ 3-4 yards of fabric are sufficient for a lap-sized quilt․ Choose fabrics with complementary colors and textures to enhance the ragged effect․ Avoid delicate or stretchy fabrics‚ as they may not hold up well during the fraying process․ Always follow the pattern’s specific fabric requirements for the best results․
3․2 Sewing Machines and Notions
A reliable sewing machine is essential for constructing a rag quilt․ A basic mechanical machine or a computerized model with straight and zigzag stitches works well․ Use a sharp denim or heavy-duty needle to handle thick fabric layers․ Cotton thread in neutral colors blends seamlessly with most fabrics․ Other notions include a rotary cutter‚ mat‚ and ruler for precise cutting‚ and scissors for clipping seams․ A walking foot or even feed attachment can help manage bulky fabric layers․ Gather pins‚ seam rippers‚ and measuring tapes to ensure accuracy․ Always test your machine’s tension on scrap fabric to avoid puckering or uneven stitching․
3․3 Scissors and Cutting Tools
Sharp scissors or rotary cutters are crucial for accurately cutting fabric strips or blocks․ Dedicated fabric scissors prevent dulling from non-fabric use․ Rotary cutters‚ with a mat and ruler‚ offer precision for straight cuts․ Curved scissors are ideal for trimming seams or clipping curves․ Always use sharp blades to avoid fraying fabric edges․ Store tools safely to maintain sharpness and prevent accidents․ Dull tools can lead to uneven cuts‚ affecting the quilt’s appearance․ Invest in high-quality cutting tools for clean‚ precise results‚ ensuring your rag quilt looks professional and well-crafted․
3․4 Batting and Backing Materials
Batting and backing materials are essential for completing a rag quilt․ Batting provides insulation and thickness‚ while the backing fabric adds stability․ Common batting options include cotton‚ wool‚ or bamboo‚ each offering different levels of warmth and loft․ For the backing‚ use a coordinating fabric that complements the quilt’s design․ Pre-wash batting and backing to ensure shrinkage is accounted for․ Busy patterns on the backing can hide minor clipping imperfections․ Choose materials that suit the quilt’s intended use‚ whether for durability‚ softness‚ or seasonal warmth․ Properly layering batting and backing ensures a professional finish and enhances the quilt’s texture․

Step-by-Step Guide to Making a Rag Quilt
Follow these steps to create a charming rag quilt: cut fabric strips‚ sew pieces together‚ clip seams for a frayed look‚ add batting‚ and bind edges neatly․
4․1 Cutting Fabric Strips or Blocks
Cutting fabric accurately is crucial for a professional finish․ Use rotary cutters and mats to ensure precise cuts․ Strips typically range from 2-4 inches wide‚ while blocks are cut into squares or rectangles․ Sort fabrics into strips or blocks based on your pattern․ Label each piece for easy identification․ For strip quilts‚ cut continuous lengths and trim as needed․ For block designs‚ ensure all squares are uniform in size․ Use pattern templates for consistent results․ This step sets the foundation for a cohesive and visually appealing rag quilt․ Proper cutting ensures seams align and the fraying process works evenly․
4․2 Sewing the Pieces Together
Once fabric strips or blocks are cut‚ it’s time to sew them together․ Align edges carefully‚ ensuring straight lines for a clean finish․ Use a ½-inch seam allowance‚ standard for rag quilts‚ to allow for fraying․ Sew strips or blocks in rows or blocks‚ depending on your pattern․ Press seams flat to help with fraying later․ For strip quilts‚ sew strips in pairs‚ then add more strips row by row․ For block quilts‚ sew blocks into larger sections before assembling the full quilt top․ Backstitch at the start and end of each seam for durability․ This step builds the quilt’s structure and texture․
4․3 Clipping and Fraying the Seams
After sewing‚ the next step is clipping and fraying the seams to create the signature rag quilt texture․ Using sharp scissors‚ carefully clip close to the seams‚ being careful not to cut through the stitching․ Clip every ¼ inch along both sides of the seams‚ ensuring even fraying․ This step enhances the quilt’s soft‚ frayed edges․ Avoid over-clipping‚ as it may weaken the seams․ For curved or angled seams‚ use a seam ripper to gently snip without damaging the fabric․ Fraying adds character and completes the rag quilt’s rustic charm‚ making it cozy and visually appealing․ This step is essential for the final look․
4․4 Adding Batting and Backing
To add batting and backing‚ start by placing the batting layer on a flat surface‚ followed by the quilt top․ Ensure both layers are evenly aligned and smooth out wrinkles․ The backing fabric should be slightly larger than the quilt top to accommodate shrinkage during sewing․ Use temporary pins or a spray adhesive to secure the layers․ For a rag quilt‚ batting is optional but adds insulation and durability․ Once layered‚ proceed to sew or tie the quilt as desired․ This step prepares the quilt for binding‚ completing its structure․ Properly attaching batting and backing ensures a professional finish and enhances the quilt’s functionality․
4․5 Binding the Quilt
Binding the quilt is the final step to complete your rag quilt․ Cut strips of coordinating fabric‚ typically 2-3 inches wide‚ and sew them together to form a continuous binding strip․ Attach the binding to the quilt’s edges using a 1/4-inch seam allowance․ Fold the binding over twice to create a secure hem and sew in place․ For a decorative touch‚ use double-fold bias tape or add a contrasting fabric․ Ensure the binding is snug and evenly spaced to create a polished finish․ This step seals the quilt’s edges and adds a professional-looking border‚ completing your handmade rag quilt project․

Tips for Beginners
Start with simple patterns‚ choose durable fabrics‚ and prewash materials to prevent shrinkage․ Use sharp scissors and a rotary cutter for precise cuts․ Watch tutorials for guidance․
5․1 Choosing the Right Fabric
Selecting the right fabric is crucial for a successful rag quilt․ Cotton fabrics are ideal due to their durability and ability to fray nicely․ Opt for coordinating colors and patterns to ensure a cohesive look․ Pre-wash all fabrics to remove finishes and prevent shrinkage․ Avoid thin or stretchy materials‚ as they may not hold up well․ Consider using flannel or muslin for backing‚ as they provide stability․ For a vintage feel‚ incorporate scraps of denim or plaid․ Always choose fabrics that complement each other in texture and weight to achieve the desired frayed effect․
5․2 Managing Seam Allowances
Managing seam allowances is vital for a professional finish in rag quilting․ Typically‚ a 1/2-inch seam allowance is recommended to allow for adequate fraying․ Ensure consistency across all seams to maintain the quilt’s structural integrity․ For heavier fabrics like flannel or denim‚ a slightly larger allowance may be necessary․ After sewing‚ clip seams at regular intervals to promote even fraying; Be cautious at corners and intersections to prevent weakness․ Use patterns or guides from free PDF resources for specific recommendations․ Practice on test blocks to achieve the desired frayed effect without compromising seam strength․
5․3 Avoiding Common Mistakes
Avoiding common mistakes ensures a successful rag quilt project․ Inconsistent seam allowances can lead to uneven fraying‚ so always maintain the recommended 1/2-inch margin․ Another error is pairing fabrics with vastly different weights or textures‚ which can cause uneven wear․ Additionally‚ failing to clip seams adequately results in minimal fraying․ To prevent bulkiness‚ press seams before clipping․ Using low-quality thread or dull scissors can also compromise results․ Finally‚ not pre-washing fabrics may cause shrinkage or fading․ By addressing these pitfalls‚ you can achieve a professional-looking rag quilt․ Free PDF patterns often highlight these tips to guide beginners effectively․
5․4 Time-Saving Hacks
Maximizing efficiency is key when working with free rag quilt patterns․ Chain piecing fabric strips or blocks saves time by reducing frequent thread cutting․ Pre-cutting fabric into uniform strips or squares streamlines the sewing process․ Using a rotary cutter and mat ensures precise‚ quick cuts․ Simplifying patterns by focusing on basic shapes or repetitive designs reduces complexity․ Batch-processing tasks‚ like clipping all seams at once‚ minimizes setup time․ Additionally‚ using wider seam allowances can reduce fraying adjustments․ These hacks help complete projects faster while maintaining quality‚ making free PDF patterns even more practical for quilters of all skill levels․
Sources for Free Rag Quilt Patterns
Discover free rag quilt patterns through quilting forums‚ crafting blogs‚ and social media groups․ PDF resources and dedicated websites offer a variety of downloadable designs for all skill levels․
6․1 Quilting Forums and Communities
Quilting forums and communities are excellent sources for free rag quilt patterns in PDF format․ Websites like QuiltingHub and Quilter’s Forum offer threads dedicated to sharing patterns‚ tutorials‚ and tips․ Members often post their own designs‚ making it easy to find unique and customizable templates․ These platforms also provide a space for asking questions and getting feedback from experienced quilters․ Additionally‚ many forums host challenges or swaps‚ where participants share their creations and patterns freely․ Joining these communities can be a great way to access a wide variety of rag quilt patterns while connecting with like-minded crafters․
6․2 Crafting Websites and Blogs
Crafting websites and blogs are a treasure trove for free rag quilt patterns in PDF format․ Popular platforms like Pinterest‚ Craftsy‚ and AllFreeSewing often feature downloadable designs․ Many bloggers share their own rag quilt patterns‚ offering step-by-step tutorials and customizable templates․ These resources cater to all skill levels‚ from beginners to advanced quilters․ Websites like Moogly and The Spruce Crafts provide a wide variety of patterns‚ including baby quilts and vintage-inspired designs․ By exploring these sites‚ you can find the perfect pattern to suit your project needs‚ ensuring a fun and creative quilting experience․
6․3 Social Media Groups
Social media groups are a fantastic resource for finding free rag quilt patterns in PDF format․ Platforms like Facebook and Instagram host numerous quilting communities where members share patterns‚ tips‚ and inspiration․ Many groups offer direct links to downloadable PDFs‚ while others share tutorials and step-by-step guides․ Pinterest is another hub‚ with users pinning and sharing free rag quilt patterns․ These groups foster a sense of community‚ allowing quilters to connect‚ ask questions‚ and showcase their projects․ Joining these groups can provide access to a wealth of resources and help you stay updated on the latest trends in rag quilting․
6․4 Printable PDF Resources
Printable PDF resources are a goldmine for quilters seeking free rag quilt patterns․ Websites like Craftsy‚ AllFreeSewing‚ and Sewing Parts Online offer a wide range of downloadable PDF patterns․ These resources often feature step-by-step instructions‚ diagrams‚ and material lists‚ making it easy to get started․ Many PDFs are designed for beginners‚ with simple layouts and clear guidelines․ Searching for “free rag quilt patterns PDF” can lead to hundreds of options‚ from classic designs to modern variations․ These printable guides are perfect for offline use‚ allowing quilters to plan and create projects without internet access․ They’re convenient‚ detailed‚ and ideal for all skill levels․
Advanced Techniques for Rag Quilts
Explore intricate designs‚ specialized tools‚ and creative fabric combinations to elevate your rag quilts․ Discover advanced methods for unique textures and visual appeal in your projects․
7․1 Adding Embellishments
Enhance your rag quilts with creative embellishments like buttons‚ appliques‚ or embroidery․ Use fabric paint or iron-on designs for personalized touches․ Add decorative stitching or ribbons for texture and visual interest․ Incorporate pre-made patches or quilt motifs to create unique designs․ Consider adding embellishments before sewing layers together or after completion for a finished look․ Use a needle and thread or hot glue for secure attachment․ These details add character and make your quilt truly special‚ allowing for endless customization and personal expression in your craftsmanship․
7․2 Mixing Different Fabrics
Mixing different fabrics in your rag quilt adds texture and visual interest․ Combining patterns‚ solids‚ and textures creates a unique‚ personalized design․ Use scraps to minimize waste and add variety․ Choose fabrics that complement each other in color and weight for balance․ A dominant fabric can unify the look․ This approach allows for creativity and resourcefulness‚ making each quilt truly one-of-a-kind․ Experiment with different combinations to achieve a design that reflects your style and preferences‚ ensuring a cozy and visually appealing finished product․
7․3 Creating Custom Designs
Custom designs allow you to personalize your rag quilt‚ making it unique and meaningful․ Start with a central theme or motif‚ then build around it using complementary patterns and colors․ Use free PDF patterns as a base and modify them to suit your vision․ Incorporate personal elements like names‚ dates‚ or symbols for a special touch․ Experiment with layout and arrangement to create a cohesive look․ This process fosters creativity and ensures the quilt reflects your individuality‚ making it a heartfelt and one-of-a-kind creation․
7․4 Adjusting Pattern Sizes
Adjusting pattern sizes allows you to tailor your rag quilt to specific needs or preferences․ Start by measuring the desired finished size and calculate fabric requirements accordingly․ Use graph paper to scale patterns up or down‚ ensuring proportions remain consistent․ For digital PDFs‚ use software to resize before printing․ Consider seam allowances and batting thickness when adjusting dimensions․ This flexibility is especially useful for creating larger quilts or using leftover fabric efficiently․ Always test scaled patterns with scrap fabric to ensure accuracy before cutting your final materials․
Free rag quilt patterns in PDF format offer a practical and creative way to craft unique quilts․ With accessible designs and step-by-step guides‚ beginners and experts alike can achieve professional results․ Embrace the versatility of rag quilting to create personalized‚ cozy blankets that stand out․ Happy stitching!
8․1 Final Tips for Successful Rag Quilting
- Precision in cutting fabric ensures even fraying and a professional finish․
- Use high-quality fabric to minimize excessive fraying and durability issues․
- Follow patterns closely‚ especially for beginners‚ to maintain design integrity․
- Wash the quilt after completion to enhance the frayed‚ textured look․
- Encourage creativity by adding personal touches within the pattern guidelines․
- Practice patience‚ as rag quilting requires time and careful attention to detail․
These tips will help you achieve a beautiful‚ unique rag quilt using free PDF patterns․
8․2 Encouragement to Experiment
Embrace creativity and don’t hesitate to explore new ideas! Rag quilting is a versatile craft that thrives on experimentation․ Try mixing unique fabrics‚ colors‚ and patterns to create one-of-a-kind designs․ Personalize your quilt by adding embellishments or incorporating meaningful fabrics․ Remember‚ mistakes are opportunities for growth and can lead to unexpected‚ beautiful results․ Use free PDF patterns as a foundation‚ then tailor them to reflect your style․ Experimenting allows you to push boundaries and develop a truly personal project․ Don’t be afraid to step outside your comfort zone—this is where the magic happens!
8․3 Resources for Further Learning
To deepen your rag quilting skills‚ explore online tutorials‚ YouTube channels‚ and crafting blogs․ Websites like Craftsy and Moogly offer detailed guides and video lessons․ Join quilting forums and social media groups for tips and inspiration․ Check out Pinterest for visual ideas and downloadable PDF patterns․ Additionally‚ consider enrolling in online classes or workshops to master advanced techniques․ Don’t forget to visit local craft stores for hands-on demonstrations․ Continuous learning will enhance your creativity and confidence in creating stunning rag quilts․ Keep exploring and enjoy the journey of mastering this rewarding craft!

Additional Resources
Explore local craft stores‚ online marketplaces‚ and quilting books for more free PDF patterns․ Check Etsy‚ library resources‚ and community boards for updated and unique designs regularly․
9․1 Recommended Tools and Supplies
For a successful rag quilt project‚ essential tools include sharp scissors‚ rotary cutters‚ and a cutting mat for precise fabric cutting․ A reliable sewing machine with a denim or heavy-duty needle is crucial for stitching through thick layers․ Use a walking foot to manage bulky seams effortlessly․ Measuring tools like quilting rulers and seam gauges ensure accuracy․ High-quality batting and backing fabrics are vital for comfort and durability․ Clips or pins help secure layers during sewing․ An iron and ironing board are necessary for pressing seams․ Optional supplies include hand-sewing needles‚ thread‚ and zippers for closures․ Quilting gloves and a thimble can enhance comfort and efficiency․
9․2 Suggested Reading and Tutorials
Enhance your rag quilting skills with detailed tutorials and guides from reputable quilting websites and blogs․ YouTube channels dedicated to quilting offer step-by-step videos for beginners․ eBooks and PDF guides provide in-depth instructions and tips for mastering techniques․ Check out Craftsy classes for structured learning․ Pinterest and Instagram are great for visual inspiration and pattern ideas․ Quilting magazines often feature articles on rag quilting․ Online forums and communities share user-generated tutorials and troubleshooting tips․ These resources help you refine your craft and explore new designs‚ ensuring a polished finish for your projects․